| Using Azure AD as a SAML IdP in Workspace ONE Access – Steve The Identity Guy | 您所在的位置:网站首页 › vmware workspace one access ad › Using Azure AD as a SAML IdP in Workspace ONE Access – Steve The Identity Guy |
Using Azure AD as a SAML IdP in Workspace ONE Access – Steve The Identity Guy
|
In this blog, we are going to setup Azure AD as a 3rd Party IdP to provide seamless authentication into the Workspace ONE Access Digital Workspace. This blog assumes that you are using native Azure AD authentication or using a federated domain that is NOT Workspace ONE Access. Lets start by logging into our downloading our Workspace ONE Access Metadata Workspace ONE Access SP Metadata Log into your Workspace ONE Access Administration ConsoleClick on Catalog -> Web AppsClick on SettingsClick on SAML Metadata Download your Service Provider (SP) metadata file
Azure AD Configuration
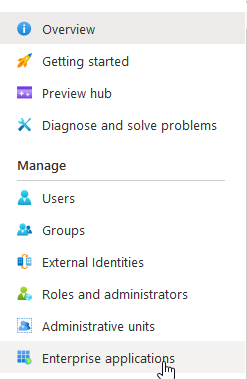
In your Azure AD Console, click on Enterprise Applications
Download your Service Provider (SP) metadata file
Azure AD Configuration
In your Azure AD Console, click on Enterprise Applications
 Click on “New Application”Click “Create your own application”Provide a name for this application. ie. Workspace ONE Access
 Click CreateClick on Single-sign-onSelect SAML
 Click on “Upload metadata file” on the top bar
 Select the file you downloaded earlier and click AddYou will not need to modify anything at this point. Click Save
 Close the SAML Configuration Window. If prompted to test the SAML, select you’ll test later. Under “User Attributes & Claims”, click EditIn this scenario, we are going to assume users are being synchronized by a connector. If you are configuring JIT provisioning of users into Workspace ONE Access, see the section on JIT. Delete all the additional claimsWe will leave the User Principal Name as the NameID and close this configuration
 Under SAML Signing Certificate, click Add a CertificateSelect New Certificate (or Import if you have a 3rd party certificate)Click Save and Close the Certificate Window when completeDownload your Metadata
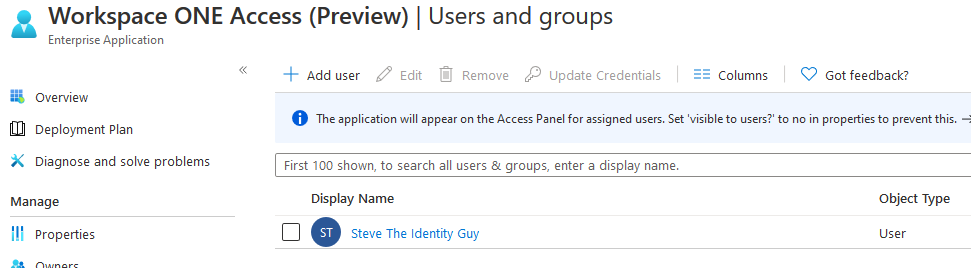
 Click on Users and GroupsAssign the appropriate users to the application
 Creating Azure AD as a 3rd Party IDP in Workspace ONE Access
Log into the Workspace ONE Administration ConsoleClick on Identity & Access Management -> Identity ProvidersClick Add Identity Provider -> Create SAML IDP
Creating Azure AD as a 3rd Party IDP in Workspace ONE Access
Log into the Workspace ONE Administration ConsoleClick on Identity & Access Management -> Identity ProvidersClick Add Identity Provider -> Create SAML IDP
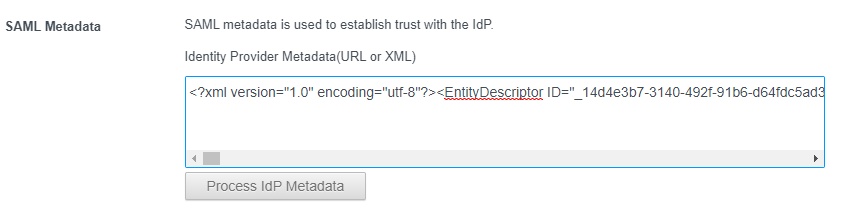
 Provide a name ie. Azure ADOpen the previously downloaded Azure AD Metadata in a text editor and copy and paste it into the metadata section
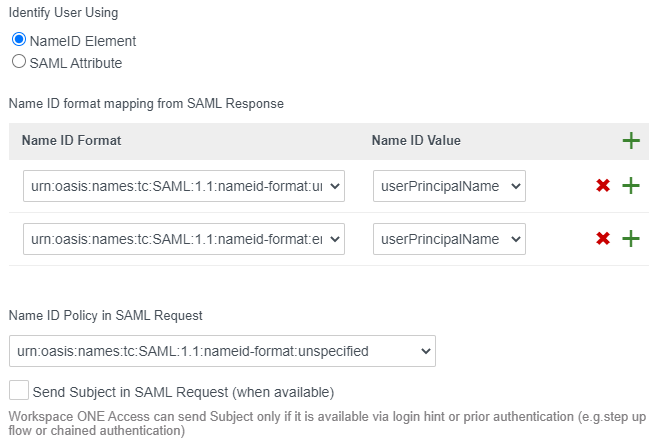
 Click “Process Metadata”Under Name ID format mapping, click the plus sign twiceAdd a mapping for “urn:oasis:names:tc:1.1:nameid-format:unspecified” and map it to “userPrincipalName”.Add a mapping for “urn:oasis:names:tc:1.1:nameid-format:emailAddress” and map it to “userPrincipalName”.
 Under “Just in Time Provisioning”, leave this blank. See Section on JIT if you are using JIT.Under Users, select the user store where the users exist. Under Network, select “All Ranges”Under Authentication Methods, provide a name such as “AzureADPassword”Under SAML Context, select “urn:oasis:names:tc:SAML:2.0:ac:classes:PasswordProtectedTransport”
 Create additional Authentication Methods as requiredEnable Single LogoutClick Add
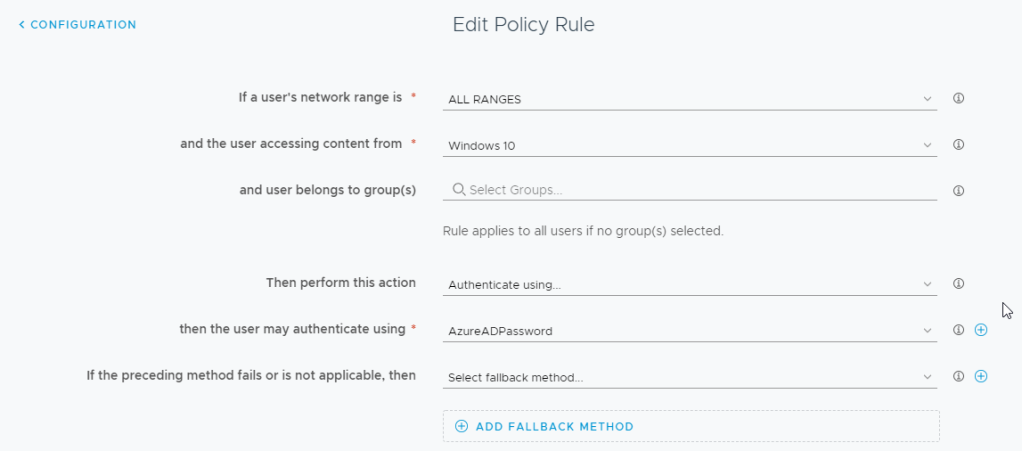
Workspace ONE Access Policy
Click on Identity & Access Management -> PoliciesEdit your appropriate policy to include the new Azure AD Password Method and save.
Create additional Authentication Methods as requiredEnable Single LogoutClick Add
Workspace ONE Access Policy
Click on Identity & Access Management -> PoliciesEdit your appropriate policy to include the new Azure AD Password Method and save.
 Testing the Configuration
In a browser, launch your Workspace ONE Access ConsoleYou should automatically get redirected to Azure ADEnter your email and passwordHopefully, you are authenticated successfully into Workspace ONE AccessIf not, use a SAML tracer to see your response back to Workspace ONE Access
Testing the Configuration
In a browser, launch your Workspace ONE Access ConsoleYou should automatically get redirected to Azure ADEnter your email and passwordHopefully, you are authenticated successfully into Workspace ONE AccessIf not, use a SAML tracer to see your response back to Workspace ONE Access
 Verify the Name ID Format and corresponding value match our configuration in Workspace ONE Access. The value in the Name ID should match the userPrincipalName in Workspace ONE Access. Adjust the configuration accordingly to match your environment.
 Note: The reason we include the unspecified format is because under certain conditions, Microsoft will use “unspecified” instead of “emailAddress”
Just-in-Time User Provisioning Note: The reason we include the unspecified format is because under certain conditions, Microsoft will use “unspecified” instead of “emailAddress”
Just-in-Time User Provisioning
While I strongly advise against Just-in-Time User Provisioning as a best practice (because there is no user lifecycle management), I’ll document the steps to configure it as there are many that still want to use it. Azure AD User Attributes & ClaimsWe will need to modify the user claims that Azure AD will send to Workspace ONE Access:Note: Do not add any Namespace with the attribute claims. Claim NameValueemailuser.mailExternalIDuser.objectidfirstNameuser.givennamelastNameuser.surnameuserNameuserprincipalNameAnother popular variation:ExtractMailPrefix (user.userprincipalname)userPrincipalNameuser.userprincipalname Workspace ONE Access 3rd Party IDP Configuration
If you are doing JIT into Workspace ONE Access, you will need to enable this when creating the 3rd Party IDP. Enable the Checkbox and provide a directory name and domain name that will be used (internally).  Testing
When you test this configuration, you will see the attributes in the SAML: 
If you look at the user which was created in Workspace ONE Access: 
Make note that we are setting the External ID. If you are using Workspace ONE UEM, these two values need to match in both systems. You can use the AirWatch Provisioning Adaptor to create accounts in UEM. Note: You can NOT update the External ID Attribute on an existing user in Workspace ONE Access. Share this:TwitterFacebookLinkedInLike this:Like Loading... Related |
【本文地址】